As an Amazon Associate, I earn from qualifying purchases
Cookie cutters are versatile kitchen tools that come in various shapes and sizes, commonly used to cut dough for cookies into decorative shapes. From simple circles to intricate designs, cookie cutters add flair and personality to baked goods, making them a favorite among bakers and home cooks alike.
Chocolate chip cookies are a beloved classic in the world of baking. With their irresistible combination of buttery dough and gooey chocolate chips, these cookies have captured the hearts and taste buds of people worldwide.
The purpose of this guide is to provide a comprehensive, step-by-step process for utilizing cookie cutters to create unique and eye-catching chocolate chip cookies. By following these instructions, readers will learn how to transform their ordinary chocolate chip cookies into delightful shapes that are perfect for any occasion.
Gather Necessary Materials
To embark on this delicious baking journey, you’ll need the following materials
- Cookie dough – prepared according to your favorite chocolate chip cookie recipe.
- Chocolate chips – opt for high-quality chocolate chips for the best flavor and texture.
- Cookie cutters – choose an assortment of shapes and sizes to suit your preferences and occasion.
- Baking sheet – for baking your cookies to golden perfection.
- Rolling pin – to roll out the cookie dough to the desired thickness.
- Flour – for dusting your work surface and preventing the dough from sticking.
- Spatula – for transferring cut-out cookies onto the baking sheet without altering their shapes.
- Optional: parchment paper or silicone baking mats for easy cleanup.
It’s crucial to use high-quality ingredients when baking chocolate chip cookies with cookie cutters to ensure the best results. Fresh, premium ingredients will not only enhance the flavor and texture of your cookies but also contribute to their overall appearance. Opt for real butter, high-quality chocolate chips, and fresh ingredients to achieve cookies that are truly a cut above the rest.
Prepare the Cookie Dough
Basic Recipe for Chocolate Chip Cookie Dough
- Ingredients:
- 1 cup unsalted butter, softened
- 3/4 cup granulated sugar
- 3/4 cup packed brown sugar
- 2 large eggs
- 1 teaspoon vanilla extract
- 2 1/4 cups all-purpose flour
- 1 teaspoon baking soda
- 1/2 teaspoon salt
- 2 cups semi-sweet chocolate chips
- Instructions:
- In a mixing bowl, cream together the softened butter, granulated sugar, and brown sugar until it become light and fluffy.
- Add the eggs one at a time. Stir in the vanilla extract.
- In a another bowl, whisk the all-purpose flour, baking soda, and salt.
- Gradually add the dry ingredients to the wet ingredients.
- Gently fold in the chocolate chips until distributed throughout the dough.
- Cover the dough with plastic wrap and chill in the refrigerator for at least 30 minutes before proceeding to the next steps.
Tips for Achieving the Right Consistency for Cookie Cutting
- Ensure that the cookie dough is properly chilled before rolling it out. This will prevent the dough from becoming too sticky and difficult to work with.
- Dust your work surface and rolling pin with flour to prevent the dough from sticking. Be careful not to add too much flour, as it can toughen the cookies.
- Roll out the dough to a uniform thickness, typically around 1/4 to 1/2 inch, to ensure even baking and consistent shapes.
- If the dough becomes too soft or warm while working with it, return it to the refrigerator to chill for a few minutes before continuing.
Adding Chocolate Chips Evenly Throughout the Dough:
- To ensure that each cookie is filled with delicious chocolatey goodness, evenly distribute the chocolate chips throughout the dough.
- As you fold in the chocolate chips, be sure to scrape down the sides and bottom of the mixing bowl to incorporate any pockets of flour or unmixed ingredients.
- Aim to have a balanced distribution of chocolate chips in each portion of dough to guarantee that every bite is packed with flavor.
Roll and Cut the Dough

Preparing the Work Surface and Rolling Pin
- Begin by lightly dusting your clean work surface with flour to prevent the dough from sticking.
- Similarly, dust your rolling pin with flour to ensure smooth rolling without sticking to the dough.
- If necessary, lightly flour your hands to prevent the dough from adhering to your fingers as you work with it.
Rolling out the Dough to the Desired Thickness
- Place a portion of chilled cookie dough onto the floured surface.
- Using your floured rolling pin, gently roll out the dough to the desired thickness, typically between 1/4 to 1/2 inch thick.
- Roll the dough evenly in all directions to maintain a uniform thickness throughout.
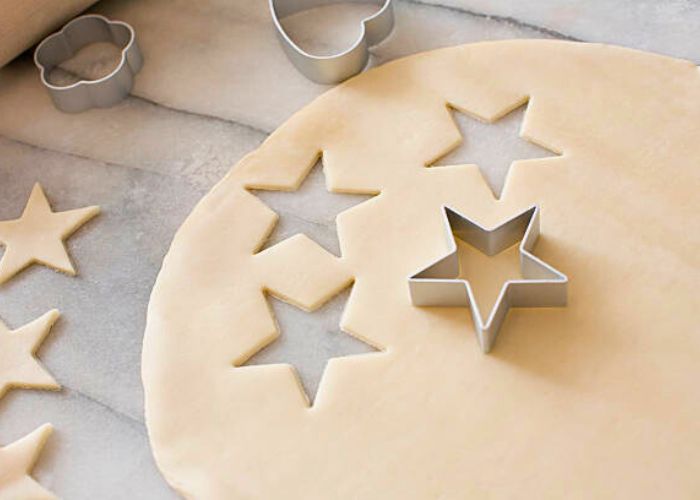
Using Cookie Cutters to Cut Out Shapes from the Dough
- Once the dough is rolled out to the desired thickness, select your desired cookie cutter shapes.
- Press the cookie cutter firmly into the rolled-out dough, ensuring that it cuts all the way through.
- Carefully lift the cut-out shapes from the surrounding dough using a spatula or your fingers, being gentle to maintain the shape.
Re-rolling and Cutting Any Leftover Dough Scraps
- Gather any remaining dough scraps and form them into a ball.
- Roll out the dough again to the same thickness as before.
- Repeat the process of cutting out shapes with the cookie cutters until all the dough has been used.
- If the dough becomes too soft or warm to work with, return it to the refrigerator to chill for a few minutes before continuing.
By following these steps, you’ll be able to roll out the cookie dough smoothly, cut out perfect shapes, and make the most out of your cookie dough without any waste.
Transfer and Bake
Using a Spatula to Transfer Cut-Out Cookies onto a Baking Sheet
- Carefully lift each cut-out cookie from the work surface using a spatula.
- Place the cookies onto a parchment-lined or greased baking sheet, leaving space between each cookie to allow for spreading during baking.
- Arrange the cookies on the baking sheet, ensuring they are evenly spaced to promote even baking.
Preheating the Oven to the Appropriate Temperature
- Before baking your cookies, preheat your oven to the temperature specified in your chocolate chip cookie recipe, typically around 350°F (175°C).
- Allow the oven to fully preheat before placing the cookies inside to ensure they bake evenly and properly.
Baking the Cookies for the Recommended Time until Golden Brown
- Once the oven is preheated, place the baking sheet with the cut-out cookies into the oven on the middle rack.
- Bake the cookies according to the recommended time provided in your recipe, typically around 8 to 12 minutes or until the edges are golden brown.
- Keep a close eye on the cookies during the last few minutes of baking to prevent them from overbaking.
- Once baked, carefully remove the baking sheet from the oven and allow the cookies to cool on the baking sheet for a few minutes before transferring them to a wire rack to cool completely.
By following these steps, you’ll ensure that your cut-out chocolate chip cookies bake evenly and achieve that perfect golden brown color that signifies they’re ready to be enjoyed.
Decorating (Optional)

Suggestions for Decorating Baked Cookies
- Icing: Use royal icing or glaze to pipe intricate designs or flood the surface of the cookies with vibrant colors.
- Sprinkles: Add a sprinkle of fun and color by topping your cookies with rainbow sprinkles, chocolate shavings, or edible glitter.
- Drizzles: Drizzle melted chocolate or caramel over the cooled cookies for an added touch of sweetness and decoration.
- Frosting: Spread a layer of frosting on top of the cookies and embellish with sprinkles, crushed nuts, or edible decorations.
- Edible Decorations: Get creative with edible pearls, fondant shapes, or edible ink markers to personalize your cookies.
Encouragement for Creativity and Personalization
- Let your imagination run wild and experiment with different decorating techniques and toppings to make each batch of cookies uniquely yours.
- Get the whole family involved in the decorating process and make it a fun activity for everyone to enjoy together.
- Personalize your cookies for special occasions such as birthdays, holidays, or themed parties by choosing cookie cutter shapes and decorations that reflect the theme.
- Don’t be afraid to try new ideas and techniques – after all, the best part of decorating cookies is the opportunity to express your creativity and make something deliciously beautiful.
Serving and Storage
Allowing Cookies to Cool Before Serving
- Once baked, allow the cookies to cool on the baking sheet for a few minutes before transferring them to a wire rack to cool completely.
- Cooling the cookies properly helps them firm up and develop their texture, ensuring a satisfying bite when served.
Tips for Storing Leftover Cookies to Maintain Freshness
- Store the cookies in an airtight container at room temperature for up to 3-4 days.
- To maintain freshness, you can place a slice of bread or a small piece of apple in the container with the cookies to help retain moisture.
- If you prefer your cookies slightly warm and gooey, you can reheat them in the microwave for a few seconds before serving.
Ideas for Presenting Cookies as Gifts or Party Favors
- Arrange the cookies in decorative boxes, tins, or jars tied with colorful ribbons or twine for a charming presentation.
- Personalize the packaging with handwritten notes or custom labels to add a special touch.
- Consider incorporating the cookies into gift baskets along with other treats or homemade goodies for a thoughtful and delicious gift.
- For party favors, package individual cookies in clear cellophane bags and tie them with festive bows or tags to match the occasion.
- Get creative with presentation ideas such as arranging cookies on decorative trays or platters, or displaying them on tiered stands for a visually appealing spread.
By following these tips, you can ensure that your chocolate chip cookies are served and stored properly to maintain their freshness and flavor, and they make delightful gifts or party favors for any occasion.
Conclusion
In conclusion, mastering the art of using cookie cutters with chocolate chip cookies opens up a world of creativity and delicious possibilities. With the guidance provided in this comprehensive guide, you now have the tools and knowledge to transform ordinary chocolate chip cookies into delightful treats that are as visually appealing as they are scrumptious.
Starting with a basic chocolate chip cookie dough recipe, you’ve learned how to achieve the perfect consistency for cookie cutting and evenly distribute chocolate chips throughout the dough. By following the steps outlined for rolling and cutting the dough, you can create beautifully shaped cookies that are sure to impress.
After transferring the cut-out cookies onto a baking sheet and baking them to golden perfection, you have the option to take your creations to the next level with decorative touches like icing, sprinkles, and drizzles. The sky’s the limit when it comes to personalizing your cookies, so let your imagination run wild and make each batch uniquely yours.
Finally, whether you’re serving your cookies fresh out of the oven or presenting them as gifts or party favors, proper serving and storage techniques ensure that they remain fresh and delicious for maximum enjoyment. With these tips in mind, you can share your homemade creations with friends and family, spreading joy and sweetness wherever they go.
In the end, using cookie cutters with chocolate chip cookies is not just about baking—it’s about creativity, personalization, and the joy of sharing homemade treats with loved ones. So go ahead, roll up your sleeves, and let the baking adventure begin!
FAQ
- Can I use any type of cookie cutter with chocolate chip cookie dough?
- Yes, you can use a variety of cookie cutter shapes and sizes to create fun and decorative chocolate chip cookies. Just ensure that the cookie cutter is sturdy enough to cut through the dough without bending or breaking.
- How thick should I roll out the cookie dough for best results?
- Aim to roll out the cookie dough to a thickness of around 1/4 to 1/2 inch. This thickness ensures that the cookies bake evenly and maintain their shape after cutting with the cookie cutters.
- Can I refrigerate the cookie dough for longer than 30 minutes before rolling and cutting?
- Yes, you can refrigerate the cookie dough for longer periods if needed. Chilling the dough for at least 30 minutes is recommended to firm it up and make it easier to work with, but you can refrigerate it for up to 24 hours if desired.
- How should I store leftover cookies to keep them fresh?
- Store the cooled cookies in an airtight container at room temperature for up to 3-4 days.
- Can I decorate the cookies before or after baking?
- You can decorate the cookies either before or after baking, depending on your preference. Decorating before baking allows the decorations to adhere to the dough during baking, while decorating after baking allows for more intricate designs with icing and toppings.
As an Amazon Associate, I earn from qualifying purchases
Leave a Reply